It’s time to support local

I heard the saddest story the other day, a butcher, who had been going for 100 years had to close down the other day. Why? Because the overheads were too high and people just don’t go to the local butcher like they used to. It’s easier to go to the supermarket. And now, a family’s legacy is gone. Just. Like. That.

Every time I go into our town centre, another shop has closed down, mostly a small business which has either been dominated by a large corporate chain or they just couldn’t pay the overheads which just keep going up. It’s super sad. That’s why I wanted to dedicate today’s post to supporting local businesses.

I love nothing more than going down to the high street on a Saturday morning and seeing the food stalls, fresh fruit and vegetables, local butchers, bakers and food trucks. Imagine going down one day and it being empty, with nothing around except a heaving McDonalds. You will realise you took something so regular and fantastic for granted.


It’s not just market stalls, brave people are starting up their own businesses all around us and we need to support them to keep them going. Take this coffee shop and Turkish bakery that Charles and I like to go to. It’s called Bakedd. They make all their fresh pastries, salads, sandwiches and breads which you can either enjoy in with a fantastic Turkish coffee, tea or turmeric latte or you can take it away. The prices are comparable to Café Nero, Costa and Starbucks but the quality is so much better and the space is quirky with an industrial feel. It even has outside seating for warm days, where you can sit along the river. It all started off with one man’s vision and it’s going strong because the people support it. It’s always full.


These are the people we should be supporting, the people doing it for themselves, trying to bring something unique to their town or village. You can’t buy 6 avocados from Sainsbury’s for £2? Or select the vegetables or the cut of meat you want for supper that night, that aren’t pre-packaged in plastic. I love the way the French buy their bread from the local baker, we should be doing the same. Yes it’s a bit more expensive than buying your loaf of Warburton’s but it tastes so much better and you are helping a business to keep going.

Look, this way of life isn’t for everyone but for like-minded people it’s a fantastic source for fresh food and it makes dishes taste so much better. Even if it’s just for special occasions, jump on the bandwagon, help the people trying to make a difference in a world full of Waitrose’s and Starbucks. You have no idea how much it means and what a difference it makes.


Chloe

Rhubarb and Custard Crumble Tart

Wow, It’s been a hot minute since I’ve posted a blog.

To be honest, I haven’t really been inspired to write, I guess you could call it writers block. I can only write a post if I am 100% in it and life has just been going by, so fast.

So what have I been up to? Well I  started my new job, we have been planning holidays and pottering around in nearby towns at local food markets. It’s been nice, relaxing and new.

This weekend we were in Henley, which is a beautiful town on the river Thames. Great boutique-y shops, market stalls and a great big park along the river where you can watch the boats go by. We tried out some pastries from a stall called ‘Brown Bread’ and let me tell you! They had some amazing stuff!! I’ll post some pictures below for you to salivate over but if you ever come across one of their stalls, get something! They are phenomenal!


Today my mother-in-law gave us some rhubarb from her garden. Rhubarb is a funny thing, it kind of looks like celery but it tastes amazing, tart but sweet when cooked properly. I wanted to make something to incorporate the fresh rhubarb and was trawling Pinterest when I came across a recipe from Delicious magazine for a rhubarb and custard crumble tart. I will post a link to the recipe below but let me tell you, roasting rhubarb is a total revelation! It retains it’s beautiful pink colour and intensifies the flavour.

20180610_171052-02.jpeg

Try the recipe here

Today I have made:

  • Pastry from scratch
  • Custard from scratch (The recipe calls for orange zest but I only had grapefruit so used that instead and also added a bit of the juice to the custard. HIGHLY RECOMMEND!)


Needless to say I am feeling pretty chuffed! If you love rhubarb, you NEED to make this! It tastes like a crumble with custard! OMG Yummy! We just polished off a slice in record time!

Oh, and for those of you who have been reading my posts for a while, I’m still doing my Cravings challenge. Last week I made the phenomenal ‘Zucchini Lasagne Bolognese’. I sometimes have a hard time with wheat, cue bloating, so to use courgette or zucchini was a pleasant change and I am quite well renowned for making a damn good Lasagne, if I can say so myself. I am so confident in my ability to produce a great lasagne that it was the first meal I ever cooked for Charles. I’m going to say I pulled it off because he has managed to make it through my cooking, experimental and all, for the past 7 years! Kudos to him 🙂

20180610_174813.jpg

I hope you all have a fantastic week!

Chloe


Crab with Squid Ink Spaghetti

Hi Everyone!

This past weekend, Charles and I spent time down in Devon, on the coast of England. I’ve never been there but it is so beautiful, anxiety inducing country lanes, fantastic seafood and just breath taking natural beauty. So relaxing and peaceful. I grew up in a small seaside town so being near the sea is so peaceful and relaxing.

20180512_104546-01.jpeg

We stopped by Salcombe Distillery and had a couple of Gin and Tonics (YUM!) and had the most deliciously fresh seafood for lunch at Hope Cove, Charles had fish and chips and I had mussels (DOUBLE YUM!).


All the fresh sea air got me inspired to make this delicious Crab with Squid Ink Spaghetti. It has a beautiful light, garlicky butter sauce using both brown and white crab meat which you can buy at Waitrose (not sponsored). If you want to have a go at making this simple dish, please see below. You can even make it with normal spaghetti or linguine but the squid ink adds a lovely seafood flavour.

Crab with Squid Ink Spaghetti                                                                      Serves 2

Ingredients

4 Cloves garlic

1 Red chilli

1tbsp Olive oil

100ml Dry white wine

50g Cold butter

1 Package 50/50 crab meat

1 Lemon, juice and rind

Squid ink spaghetti. enough for two

Salt

Pepper

Handful fresh parsley

Method

  • Bring a pot of salted water to the boil and cook the pasta according the package instructions.
  • Over a medium heat, fry the garlic and chilli in the olive oil.
  • Deglaze the pan with the wine and cook for a couple of minutes before removing from the heat.
  • Add in the butter, gradually, whisking to emulsify.
  • Next add the brown crab meat and stir until incorporated.
  • Once the pasta is cooked, add to the sauce, keeping back some of the cooking water from the pasta for later.
  • Finish off the dish by adding the white crab, lemon juice and rind and seasoning as required. If at this point, you find the sauce a bit dry add a bit of the reserved cooking water.
  • Serve and garnish with the parsley and lemon


20180517_135343.jpg

This recipe is perfect for Spring and Summer and is so easy to make, I highly recommend trying this out!

Chloe


Biscuit Series: Homemade Oreos

Hi Everyone,

Yesterday I was listening to a podcast with Oprah (Queen) and Amy Schumer and they were discussing body confidence and insecurities and it got me thinking, why do we put so much pressure on ourselves as woman to portray what is deemed ‘perfect’. It’s so tiring constantly striving to be a perfect size 10, constantly being on a diet, self criticising for setting goals which are unobtainable and we naturally don’t achieve because not everyone is meant to look the same. I thought back to when I was really little and even then the people around me in life and in the media were drumming into us that we need to be waif like in order to be happy. I’m just starting to think that that’s a load of crap! Think about how strong your body is, how strong you are in your snug size whatevers. Your body has carried you through everyday without fail, brought you through difficult times whether it be emotional or physical, you made it in the body you have. So stop putting so much pressure on yourself to be this perfect being, have confidence in who YOU are and enjoy your life. Be Happy. Be Healthy.

This brings me onto my next and final recipe in my biscuit series: Homemade Oreo’s. In South Africa the Oreo’s advert was of this kid and his dog out in the back yard and the kid would go ‘first your twist it, then you lick in, then you dunk it’. It was an American advert so some of you may have got it too? So now every time I eat an Oreo I think of that kid and his dog. These are super easy to make and very moreish!

LRM_EXPORT_20180509_163823.jpg

Homemade Oreos                                                                               makes 20-30 biscuits

Ingredients

For the biscuits

160g Flour

125g Sugar

60g Cocoa powder

1tsp Bicarbonate soda

1/4tsp Baking powder

Pinch salt

60g Butter, Softened

1 Egg

For the filling

120g Butter, Softened

240g Icing sugar

2tsp Vanilla extract

Method

For the biscuits

  • Mix together the flour, cocoa powder, baking powder, bicarbonate soda, salt and sugar in a bowl.
  • In a separate bowl cream the butter then add the egg and incorporate fully.
  • Gradually incorporate the dry mixture into the wet mixture and mix until it forms a dough. TIP: if the dough is a bit dry, add some water a little bit at a time until you are happy with the consistency.
  • Place the dough in cling film and refrigerate for 30 minutes.
  • Preheat the oven to 180°C (360°F)
  • On a floured surface, roll the dough out to about 1/2 cm thick. Using a cookie cutter, cut out the biscuits and place them on a greaseproof paper lined baking sheet. Make sure you make an even amount of biscuits.
  • Bake for 10 minutes until the biscuits are crisp entirely.
  • Leave to cool completely before forming the sandwiches.

For the filling

  • Cream together the butter and vanilla before gradually adding in the icing sugar. Beat until light and fluffy.
  • You can either then pipe the filling into the centre of the cooled biscuit or use a teaspoon to dollop on a small amount before taking another biscuit and pressing gently down to create your Oreo.

20180509_164309.jpg

I hope you have enjoyed my biscuit series, let me know if there are any other series you would be interested in reading about.

Have an amazing weekend!

Chloe


Biscuit Series: Oat and Raisin Biscuits (Vegan)

Hi Everyone,

Another day, another biscuit recipe and this next one is a goodie but before I get into the recipe let’s have a quick life update.

One and a half week’s left of my garden leave, I wish it could go on and I could just be a full time blogger and wannabe food photographer but for now, it’s back to work, soon.

Charles and I have been binge watching this YouTube channel (click on the name to go to their YouTube) called ‘Sailing La Vagabonde’. It’s a young Australian couple who have been sailing around the world and vlogging about it for the past few years. We are seriously considering buying a boat (we’ve been window shopping online) and sailing the world, should be vlog about it? Ah, what bliss to live a simple life where you are only answerable to yourself! If anyone is selling a yacht for a great price that is sailable, let me know!

Onwards to this delicious recipe. When I was young, my granny and I used to make these South African oat bars called ‘Crunchies’ similar to what we have in the UK and call flapjacks, but they have a crunchy outside, hence the name. These vegan Oat and Raisin biscuits so remind me of these and they turned out pretty spectacular. My only word of advice is when you get to the rolling of the biscuits into balls, if they are a bit dry add a tablespoon of water to get the mixture sticky.

LRM_EXPORT_20180508_142155.jpg

Vegan Oat and Raisin Biscuits                                               Makes 15 biscuits

Ingredients

140g Rolled oats

125g Flour

80g Desiccated coconut

80g Raisins

1tsp Baking soda

1/2tsp Cinnamon

200g Granulated sugar

100ml Vegetable oil

3tbsp Maple syrup

1tsp Vanilla extract

1tbsp Water (if required)

Method

  • Preheat oven to 180°C (360°F)
  • Add the oats, flour, coconut, raisins, baking soda, salt and cinnamon to a mixing bowl and combine.
  • In a separate bowl, mix the oil and sugar together until fully incorporated, then add the syrup and vanilla essence.
  • Mix the dry ingredients into the wet ingredients until you have a crumbly consistency.
  • Next add the water and incorporate using a small amount at a time, until the mixture forms a ball when you squeeze/roll it into walnut sized balls (the water is only necessary if the next mixture is too dry).
  • Roll the mixture into 15 biscuits and place them on a greaseproof paper lined baking sheet, pressing them down with the back of a spoon.
  • Bake for 20 minutes until golden brown and the edges should be crisp but the centre is still soft (these will firm up while cooling). Leave to cool completely on a wire rack.

LRM_EXPORT_20180508_142127.jpg

I have my last biscuit recipe going up tomorrow. Keep your eyes peeled, its a goodie!

Chloe

Biscuit Series: Flourless Chocolate Biscuits

Hi Everyone,

Wow what a weekend we’ve had. The weather in the UK has been phenomenal and with great weather comes loads of good food and drink. On Saturday, Charles and I celebrated Cinco de Mayo and while we have no Mexican heritage we love Mexican food and it was such a great opportunity to try out some more Chrissy recipes from the Cravings cookbook: Pepper’s hot green pepper sauce, Cheesy guacamole, Roasted jalapeno and chorizo queso and Pan charred fish tacos. Such great food and we ate far too much!

LRM_EXPORT_20180505_190749[1].jpg

So, after such a heavy foodie weekend, it seems only right to follow it up with these gooey Flourless Chocolate Biscuits. They’re gluten free, and oozy like a brownie biscuits and what’s better, they only has 6 ingredients! SO SIMPLE!!

Flourless Chocolate Biscuits                                                  Makes 6 giant biscuits or 12 small ones

Ingredients

180g Icing sugar, sifted

35g Cocoa powder, sifted

Pinch salt

3tbsp Vegetable oil

1tsp Vanilla extract

100g Dark chocolate, roughly chopped

Method

  • Pre-heat oven to 180°C (360°F)
  • Sift together the icing sugar, cocoa powder and salt, then stirring together until combined.
  • Add the vanilla extract and oil to the icing sugar mixture and stir until fully incorporated. You should have a glossy mixture.
  • Fold in the dark chocolate.
  • Scoop the mixture into biscuit shaped dollops on a greaseproof paper lined baking sheet, leaving enough space between each biscuit as they will spread.
  • Bake for 20 minutes for large biscuits or 12-14 minutes for smaller biscuits. They are ready when the tops and glossy and have started to crack.
  • Allow to cool completely before removing from the baking sheet.

LRM_EXPORT_20180508_141811[1].jpg

These are fool proof, anyone can make them and they taste incredible. I also added a sprinkle of salt to the tops of the biscuits, this really enhances the chocolate flavour. Let me know if you want me to add calorie information to my recipes going forward, just something I’ve been toying with.

Stay tuned tomorrow, I have a delicious vegan biscuit recipe to share!

Chloe

Biscuit Series: Lemon and Thyme Shortbread

Hi Everyone!

I’m watching another episode of Sex and the City and wondering, how they all afforded their lives. Dinner at the hottest new restaurants, designer clothes and shoes and moving in the high society circles of Manhattan. Correct me if I’m wrong but if these characters were out there in the real world, would they be living the same lives? How many people buy into this ‘attainable’ life but in reality you need to work damn hard to have enough money to facilitate this lifestyle and when you do have the money, you’re too tired from work to enjoy it? Perhaps I’m too pessimistic? Rant over.

My second instalment of my biscuit series features a different take on shortbread. When I was a teenager I had a school friend who I would spend summer holidays with. Her parents had a holiday home down on the east coast of South Africa. We would spend days reading, kayaking and baking. Her mother was a cool woman and she taught me how to make brownies and shortbread, so making shortbread today has been like a trip down memory lane.

20180503_162622

We live in an apartment so don’t have our own garden, we do however have a very successful herb garden which Charles lovingly tends to as my track record with plants is awful. I took to our little herb garden for some shortbread inspiration. So let me introduce you to my Lemon and Thyme Shortbread!


Lemon and Thyme Shortbread                                                  makes 15-20 biscuits

Ingredients

160g Flour

80g Butter, soft

40g Granulated Sugar

1tsp Fresh Thyme, chopped

1tsp Lemon Zest

1tbsp Lemon Juice

1/2tsp Vanilla Extract

Pinch of Salt

Method

  • Preheat the oven to 180°C (360°F)
  • Cream the butter using a hand or electric whisk and the gradually add the sugar until incorporated.
  • Next add the thyme, lemon zest, lemon juice and vanilla extract and mix until fully incorporated.
  • Gradually add the flour and salt to your butter mixture until it resembles fine crumbs.
  • On a floured surface, knead the mixture until it comes together to form a ball, if you find the mixture to be too dry, add a bit more lemon juice. Leave to rest in the fridge for 30 minutes.
  • Once rested, on a floured surface roll your dough to 1cm thick. Using a cookie cutter or jar, cut out cookies and place on a grease paper lined baking sheet.
  • Prick biscuits with a fork and sprinkle with sugar.
  • Bake until golden brown, 25-30 minutes.

20180504_143515.jpg

These can be kept fresh wrapped in greaseproof paper in an air tight container, if they last that long!

Stay tuned for another recipe tomorrow, Hint: it involves chocolate!

Chloe

Biscuit Series: Peanut Butter Biscuits

Hi Everyone,

As the weather in England is unable to decide on weather it’s winter or spring, and I’m so used to having a wet head that I don’t even bother wearing a raincoat or using an umbrella. The crap weather has given way to inspiration in a form I am usually unskilled in: baking.

I thought I would test myself and do a ‘biscuit series’, 5 recipes over the course of the week and I will of course incorporate a gluten free and vegan recipe in my 5 biscuits.

We need to thank Jessie Sheehan an awesome woman and face behind the Vintage Baker Cookbook for the inspiration behind this series. A month ago she sent me a recipe for her Silver Cake which I made for my dad’s birthday. It was literally the best cake I’d ever made. This coming from the girl who once made a Betty Crocker Devils Food Chocolate Cake for one of Charles’ birthday’s and passed it off as my own! I even bought the icing!!

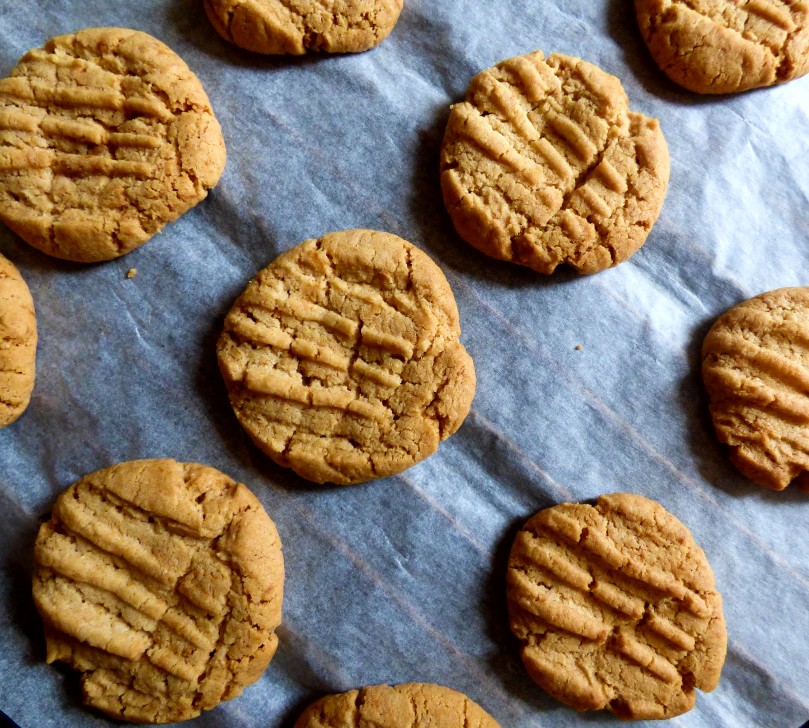
Making peanut butter biscuits with my sister’s when we were kids, is such a strong memory for me that I couldn’t not start with this winner of a recipe! What’s more my sister’s used to call me ‘Peanut Butter Brain’ because I, Chloe White, am addicted to peanut butter. Yum!

20180502_175250

Peanut Butter Biscuits                                                                     makes 12 Biscuits

Ingredients

40g Butter, soft

60g Smooth Peanut Butter

80g Granulated Sugar

100g Flour

Pinch of Salt

1/4tsp Bicarbonate Soda mixed with

1tbsp Milk

1/2tsp Vanilla Extract

20ml Vegetable Oil

Method

  • Preheat oven to 150°C (300°F)
  • Beat the butter, peanut butter and sugar together until combined.
  • Add the oil and mix until incorporated.
  • Sift in the flour, and salt into your wet ingredients and then add the bicarbonate soda and milk mixture. Mix until fully incorporated.
  • Shape into walnut sized balls onto a baking sheet lined with greaseproof paper. Pressing down onto each biscuit with a fork.
  • Bake for 25 minutes until golden brown. If still undercooked, leave in oven for 5 minutes with the oven off.
  • Leave biscuits to cool on a wire rack.

This recipe can easily be doubled to make more, which is probably a good idea as the batch I made hasn’t even lasted a day!

20180502_190432.jpg

Keep your eyes peeled for a new recipe tomorrow..

Chloe

A Little Get to Know Me and another Chrissy Recipe

Hello lovely people who read my blog!

So the reading and Sex and the City Marathons continue into week two of my garden leave, which has left me with an expanded vocabulary and a craving for a Cosmopolitan. Waiter!

Someone asked me the other day why I was putting myself on the internet by doing this blog. To me it’s just a hobby, a creative outlet to share the things I love to all 12 of you that read my ramblings. It also got me thinking that I haven’t actually shared that much about myself on here. So I thought I would share a few bits about me so we can get to know one another.

My name is Chloe White and I am married to the most amazing man, who puts up with all of my hair-brained ideas, experimental cooking and dislike of doing the dishes.

I think I’ve always loved cooking but it wasn’t until I worked in the world of hospitality and Michelin stars that my inner foodie awoke and thanks to my husband this goes hand in hand with my love of good wine.

I was brought up in sunny South Africa, on the coast and nearly a decade ago I moved to drizzly England. Despite the constant rain and grey skies, I love it in the UK and I now think of it as home.

FB_IMG_1490381565977

I am also still working my way through Chrissy Teigen’s cookbook Craving’s which leads me onto the next part of my blog. The best meatloaf I’ve ever made, thanks to Chrissy.

I think it was the mixture of beef mince and chorizo sausage that took this to the next level, with hardly any other ingredients and the focus solely on the meat (apologies for the use of that phrase for any other people whose minds are in the gutter).

I served it with braised red cabbage and sweet potato mash.

It was soooo good! I’m just annoyed that I was too greedy to get a great picture. Good excuse to make it again!

20180502_162426

Hope you all have a great week and bank holiday weekend (UK)!

Chloe


Prosciutto Wrapped Stuffed Chicken Breasts with John’s Crispy Roast Potatoes

Hi Everyone,

So I’m currently on what they call garden leave, which is basically me working my notice period from home without doing any work. I’m not quite sure how I am going to fill the next four weeks but this is one of those rare moments in life where you can take a break from the mundane and do the things that make you happy.

It’s now 3 o’clock on a Tuesday and I’m watching Sex and the City while writing this blog. I’ve spent the day recipe testing, eating and working out and I feel utterly relaxed and chilled out, which is something I only ever feel on holiday. I feel happy.

Anyway, enough about my feelings, we’re all here for the food.

A few weeks ago we had my cousin and her boyfriend come over for Sunday lunch and I turned to Chrissy for some inspiration. While thumbing through my beloved Cravings cook book I came across ‘Prosciutto Wrapped Stuffed Chicken Breasts’ which I paired with ‘John’s Crispy Roast Potatoes’

Wow wow wow! The best recipe I have made from this book so far. Dead simple to make, bloody tasty and a great way to release some pent up aggression.

They say a picture’s worth a thousand words, so I’ve put some in this post for you to feast your eyes on and if you’re still reading this and don’t own the Craving’s cookbook, you need to get it NOW! You don’t even need to leave your house for it. Buy it on Amazon.

20180424_145514

I’m off to put the finishing touches on my ‘no bake peanut butter chocolate oat bars’ for which I will write about soon if they turn our well!

Hope this week is good to everyone

Chloe

Recipe: Root Vegetable Soup with Bacon Crumb

As we gently edge our way into spring, it’s not quite warm enough to give up hearty comfort food in favour of cold cuts and salads. We recently discovered these roasting packs from Sainsbury’s, which cost £1 and consist of an onion, suede, parsnip and a couple of carrots. These are amazing for turning into soups. Soups however can be quite boring so I came up with this recipe which elevates this soup to a whole new dimension. I introduce to you root vegetable soup with BACON CRUMB. This is so simple to make and takes no longer than 30 minutes so is perfect for a mid-week supper.

Ingredients                                                                                                                Serves 4

1 small onion

2 garlic cloves

2 carrots

1 parsnip

1 small suede

1 small sweet potato

1 tsp mixed herbs

1 litre chicken or vegetable stock

1 tsp sale

½ tsp pepper

For the crumb

2 slices bread

1 tbsp grated parmesan

1 tbsp oil

Pinch sale

Pinch pepper

3 slices streaky bacon

Method

For the soup

Chop your onion, garlic, carrots, parsnip, suede and sweet potato into rough chunks. You want to have them all a similar size so that they cook at a similar speed. No need to be precise here as they will all be blitzed up.
Add the vegetables to a large pot and cover with the stock, you want the stock to be just covering the vegetables so that they cook evenly.
Once the vegetables are cooked add everything to a blender and blitz up to a consistency you desire. I like my soup smooth so I blitz it for a bit longer until everything is silky.
Transfer back into the pot over a low heat to keep warm.

For the crumb

Heat your oven to 200 degrees Celsius.
Tear up your bread and pulse in a food processor until you have breadcrumbs.
Transfer your breadcrumbs into a metal baking dish and add the oil, parmesan salt and pepper and mix until everything is evenly coated in oil.
Put the breadcrumbs in the oven and cook until golden brown (about 10 minutes).
While the breadcrumbs are in the oven, fry your bacon on a high heat until crispy.
Once the bacon is cooked, pulse in the same food processor until it reaches a nice rough ‘crumb’.
Once the breadcrumbs are golden add the bacon and voila! Delicious bacon crumb!!


All that’s left to do is serve the soup, top with the crumb and enjoy. It’s so delicious and adds a great crunch to your dish. Soup is such a great way to get your vegetables in or to use up vegetables that are on their way out.

Hope this week is good to you!

Chloe

20180415_184954.jpg


Recipe: Easy Sodabread

I don’t often eat bread as it doesn’t always agree with me so when I do, I like to eat interesting bread rather than just a loaf of white or brown sandwich bread. We recently got into eating soda bread as a quick breakfast in the morning’s before work. It’s also meant to be quite low maintenance when it comes to make it from scratch as the dough doesn’t need to proof so Charles and I thought we would give it a go and it turned out great! See the recipe we used below.

Ingredients

340g plain flour

½ tsp bicarbonate soda

½ tsp salt

300ml buttermilk

Method

Preheat your over to 200 degrees C.
Combine the flour, salt and bicarbonate together in a bowl
Form a well in the middle of the flour and pour in the buttermilk, mix quickly with a fork to incorporate into the flour mixture. Once incorporate use your hands to bring the dough together, if you find at this stage that the dough is a little dry, add a splash of milk.
Once you have formed a dough, put on a floured surface and knead for about 5 minutes. You’ll know once this is ready once the dough bounces back if you press a finger lightly against it.
You can either form the dough into a ball, put on a grease proof paper lined baking sheet and cut an X over the top of the dough or what we did, is put it into a floured loaf tin.
Cook for 30 minutes or until the bread sounds hollow when you knock it.
Let cool on a wire rack and enjoy!


This recipe is super simple to do and makes a small loaf of bread. It also only cost us 90p to make compared to the £1.30 you would pay for the same size loaf in the shop. Yes buying it is more convenient but there is nothing better than homemade bread with lashings of salted butter. Yum!

LRM_EXPORT_20180412_200334

Chloe